In March 2026 an Israeli buyer sent me a video. The disposer was running, water was dripping under it, and he wanted to know whether the machine was finished. We had been talking for a long time by then, and he had never placed an order. The unit in that video was not ours.
I asked him to take the discharge connection apart and look at the sealing parts inside it. If one of them had aged, change that before touching anything else. He did. One connection part had gone hard, he swapped it, and the dripping stopped.
The drip was real. The machine was fine.
Anyone reporting a garbage disposal leaking from the bottom reset button is describing the place water left the housing. Water finishes at the lowest point on a disposer, whatever opening it came through above. So our after-sales sequence starts outside the machine, and it moves inward only once the outside is dry.
Dry It, Then Run It Again
When a leak video arrives, the first thing we ask for is a second video.
Wipe the outside of the unit and every connection dry. Set the camera so the discharge, the dishwasher hose and the body below them stay in frame together. Then run the water. We want the first place that goes wet, not the last place a drop falls off.
Published manufacturer troubleshooting reaches the same result with paper. Wrap paper at the sink flange, at the discharge elbow and at the dishwasher connector. Fill the sink, release the stopper, then run the water and the disposer while watching. One support page tells the user to leave the paper under the unit for a few days when the first pass shows nothing.
Timing splits the ticket. Water present while the sink is still holding points at the flange and the mount. Water that shows up only during drain-down points at the discharge path. A leak that appears after a dishwasher cycle sends the inspection to that hose instead.
Tickets arrive with several symptoms stacked together: no start, humming, slow drain, a wet cabinet floor. Our complaint-routing guide for disposers that stop working takes those branches. This one stays with water.
The Bottom of the Housing Collects Water From Everywhere Above It
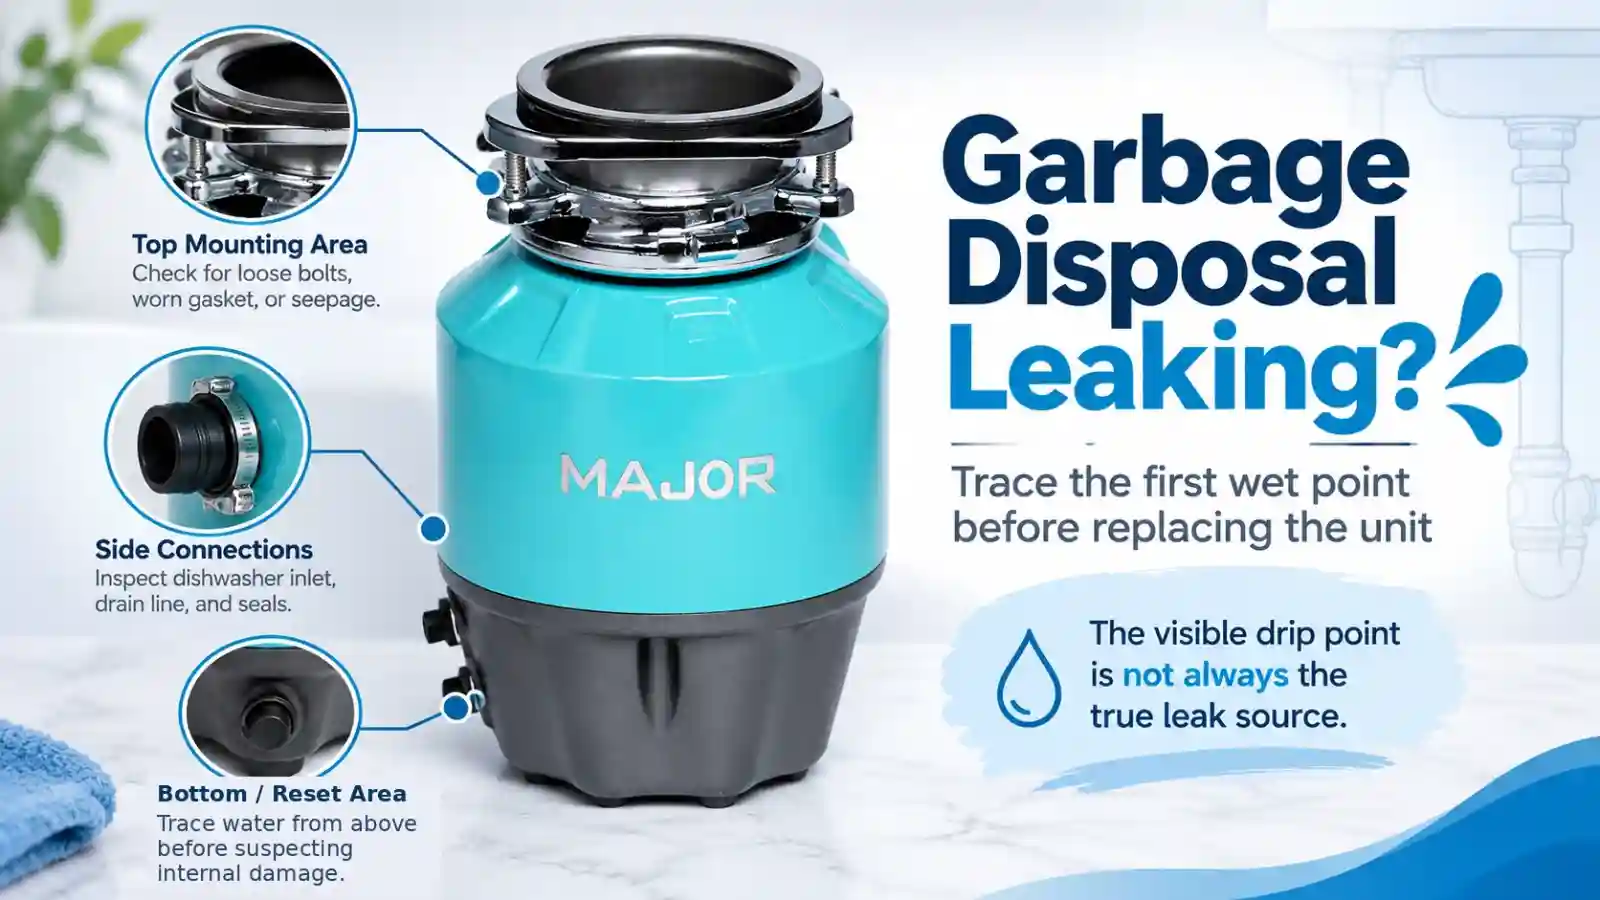
A disposer gives water a lot of outside surface to travel across. The sink flange and mount sit on top. The dishwasher inlet and the discharge connection sit on the side. The lower cover and the reset area sit under both of them. Gravity does the rest.
One published troubleshooting page documents the path directly. A damaged drain discharge gasket lets water run down between the shell and the disposer. It comes out at the cover plate on the bottom. The same page separates the housing outside, the dishwasher connector and the bottom plate into different checks. A bottom drip is not filed as an internal failure by default.
The Israeli video followed that shape. The machine was running and water was visible underneath. The useful question was which connection went wet first. Once the aged part was replaced, there was no reason to open the machine at all.
For an importer this is a coding decision rather than a plumbing opinion. A sealing part riding along with the next order costs a carton slot. A replacement unit shipped against a leak nobody has located costs freight both ways and a credit. Then the new machine drips in the same place, for the same reason, and the complaint comes back.
On Our Line, Every Unit Sits With Water in the Chamber for 48 Hours
Each completed disposer gets water in the grinding chamber and is checked for leakage. The unit then stands switched off, water still in the chamber, for 48 hours. We also run it under continuous flow and inspect it powered and unpowered. When water shows up anywhere in that sequence, the point is found before the unit is cleared.
That gives us a baseline and nothing more. A chamber or body leaking before shipment gets caught by the water-holding check. Sink, drain and dishwasher connections are made after the unit leaves us. They still need field inspection.
So when a unit that cleared the 48-hour check starts dripping within weeks of installation, we open the interfaces first. Nobody is being accused of anything. It is the shortest route to separate a connection from the body.
We build and test the disposer and the fittings we ship with it. We do not read concealed drain piping or a wall line off a customer video.
A New Install and an Older Unit Start at Different Checks
Both can leave a drop in the same place under the cabinet.
For a newly installed disposer we start at the mounting and the external connections. The sink-side assembly, the discharge connection, the dishwasher path where one exists, and drain-part alignment come first. A loose fastener deserves attention before anything gets dismantled. So does a seal that never seated square, or a pipe pulling sideways on the outlet. Published installation guidance runs the same order. It tests the sink flange, the dishwasher connection, the tailpipe and the mounting assembly once the unit is in. A new-install leak goes back to the locking ring and the three mounting screws.
For an older unit, aged rubber moves up the list. That was the whole story in the Israeli video. Gaskets, O-rings and hose connections live in a wet environment for years. Replacing one of them does not require writing off a disposer.
Our mounts seal with gaskets, so our own review starts at the gasket and at how the mount was stacked. I don’t have enough first-hand experience with plumber’s putty to tell an installer to use more of it or less. The installation instructions written for the systems that use putty are better on that point than I am. We also don’t rank 3-bolt against EZ-style by leak risk. When a leak starts at the mount on a new installation, the check is gasket seating and the screw sequence, in either family.
A thick sink follows the same logic. It needs a flange with enough usable length, which sometimes means an extended or custom part. Our flange size and thick-sink fitment guide handles that separately, so it stays out of leak diagnosis.
“Leaking From the Side” Is Not Yet a Part Number
On Major units the discharge connection uses a rubber sealing element with a metal flange and two screws. All of it is available as spare parts. When water first appears there, we look at how the seal is seated, at screw tightness, at pipe alignment, and at the outlet itself. A cracked outlet and a loose connection are two different tickets with two different answers.
The dishwasher side runs its own path. We can supply the hose, and depending on the installation the joint uses a connector or a clamp. The dishwasher inlet on our housing is formed as part of the housing, not fitted as a separate inlet body. Water starting at the hose or the connector keeps the case outside the machine. Our dishwasher connection guide goes further into that interface.
A photo taken ten minutes after the leak makes all of these look identical, because by then the water has spread across the whole shell.
The Reset Opening Is Not a Water Path on Our Units
On our units the reset opening on the lower body carries no water in normal operation. I have not handled a verified service case where water originated at the reset button itself.
So a complaint that names the reset area gets traced upward. The discharge connection, the dishwasher connection, the mount and the outside of the housing all have to come back dry first. A damaged discharge gasket runs water down inside the shell and lands in exactly that spot.
Once those paths are confirmed dry, the case changes shape. A first wet point at the reset and bottom area stops being a fittings problem. The machine gets opened: a blocked outlet path, a crack, damage inside the chamber.
We do not patch a confirmed internal water problem with another external part. Fittings are service items. A damaged chamber or body is a unit case. Stacking gaskets onto one wastes two more rounds of shipping before anyone admits that.
Which is why can you fix a garbage disposal leaking from the bottom has no answer from the drip location alone.
What We Keep as Spares, and What Stops Being a Parts Case
Leak-related external parts are worth stocking: sealing parts, flanges, discharge components, hoses, connectors and the fittings that go with the SKU. They can ship with an order or follow later for a confirmed service case. An importer holding none of them has one move when a gasket ages, which is to send a whole new machine. The part becomes freight. The aged connection is still sitting there when the replacement goes on.
Our intake asks for a video shot after the unit has been dried, the model, and how long the unit has been installed. The customer shows when water appears. The discharge and dishwasher areas stay visible long enough to catch the first wet point.
If the problem stays outside the disposer, our answer stays outside the disposer too. If every external connection is clear and the unit has an internal quality problem, we treat it as a whole-unit case. We do not ask the customer to keep changing small fittings. Our repair-or-replacement guide covers where that decision sits in our after-sales process, and the parts themselves sit with the product configurations we supply. A drop at the bottom starts the inspection.
FAQ
Can you fix a garbage disposal leaking from the bottom?
Yes, when the water comes from a connection. Dry the unit, run it again, and find the first surface that goes wet. A discharge or dishwasher joint sending water down the shell is a parts repair, and those parts are cheap and they ship. A leak confirmed at the disposer body itself is a different case. We handle that one as a whole-unit case rather than a gasket job.
Why is my garbage disposal leaking from the reset button?
Confirm that the reset area is where the water starts. Water from the discharge, the dishwasher connection or the mount travels down the housing and arrives there. On our units the reset opening carries no water in normal operation. A verified first wet point there sends the unit to internal inspection.
Why is water leaking from the bottom of my garbage disposal after installation?
Check the mounting and the external connections before opening anything. On a new install, start at the sink-side assembly, the discharge joint and the pipe alignment.
Can a discharge gasket make a disposer look like it is leaking from the bottom?
Yes. A damaged one sends water between the shell and the unit, and it drains out at the bottom cover plate.
Is a garbage disposal leaking from the top always a flange problem?
No location names the failed part on its own. On our gasket-based mounts we check the sealing parts and how the stack was assembled. The sink seal above the flange gets inspected in the same pass.
Sources
Public troubleshooting and installation references
- InSinkErator — Garbage Disposal Leaking — Separates mounting, discharge, dishwasher-inlet, bottom and container-body leak paths. It specifically tells users who see water at the bottom to confirm that it is not dripping down from another area first.
- InSinkErator — Garbage Disposal Leaking from the Mounting Assembly — Covers mounting assembly, locking ring, three mounting screws and excess plumber’s putty. Its hard-to-find leak procedure uses fill, drain and run checks and recommends leaving paper below the sink if the leak does not appear immediately.
- InSinkErator — Garbage Disposal Leaking at the Discharge — Directs the user to check discharge fasteners, gasket debris or damage, and cracks at the discharge elbow or trap joint.
- InSinkErator — Garbage Disposal Leaking at the Dishwasher Inlet — Covers clamp tightness, hose-adapter condition and the elbow/trap joint, and repeats the fill-drain-run method for locating hard-to-find leaks.
- InSinkErator — Installing a New Garbage Disposal — Shows the mounting sequence, alternate tightening of the three mounting screws, discharge and dishwasher connections, and a final leak test at the sink flange, dishwasher, tailpipe and mounting assembly.
- Moen Solutions — Leak Underneath: Existing Garbage Disposal — Uses paper towels at the sink flange, discharge elbow and dishwasher connector to isolate a leak. It also documents that a damaged discharge gasket can send water between the shell and the disposer and out near the bottom cover plate.
Major internal production and after-sales records
The March 2026 Israeli buyer video, Major’s every-unit chamber water check, the 48-hour switched-off water hold, powered and unpowered continuous-flow inspection, the construction details of Major discharge and dishwasher connections, spare-part practice, and the stated reset-area service boundary are Major internal production and after-sales records.
Major uses these records to describe its own inspection and service sequence. Public manufacturer pages above are used only as external anchors for general leak-tracing, mounting, discharge and dishwasher-connection mechanisms.